Today’s digital world depends on file formats. They are key to how we store, share, and access data. One of the most common tasks you may encounter is converting image files from one format to another. This blog post will walk you through the process of converting.TIFF files to .JPEG images. They are created using the online tool FileProInfo.
What are TIFF and JPEG Files?
Before we start the conversion process, let’s define TIFF and JPEG files. We’ll also talk about why you might need to convert them.
TIFF (Tagged Image File Format): TIFF (Tagged Image File Format) files are popular among photographers and graphic designers. They can store high-quality images without losing detail. They can handle multiple layers and pages, making them ideal for complex graphics. But, TIFF files are usually large. They may not be supported by all devices or apps.
JPEG (Joint Photographic Experts Group): JPEG (Joint Photographic Experts Group). JPEG files are popular. They balance image quality and data size well. They use lossy compression. It cuts file size but may slightly lower image quality. JPEGs work with almost every device and app. They are great for sharing and showing images online.
Why Convert TIFF to JPEG?
There are several reasons you might want to convert a TIFF file to a JPEG:
- Compatibility: JPEG files are more universally compatible with various devices and software.
- File Size: JPEGs are generally smaller in size, making them easier to share and store.
- Readability: JPEG files tend to be more readable and easier to manage than TIFF files.
- Editing: JPEGs are simpler to edit using most image editing software.
How To Convert TIFF to JPEG Using FileProInfo
Now, let’s go over the steps for converting a TIFF file to a JPEG with FileProInfo, a free online converter.
Step 1: Access FileProInfo
To start, launch your web browser. Go to the FileProInfo website. You can do this by entering “FileProInfo TIFF to JPEG converter” into a search engine. Or, you can go directly to the URL: https://fileproinfo.com/converter/tiff-to-jpeg.
Step 2: Select the TIFF to JPEG Converter
On the FileProInfo homepage, you will find a number of file conversion options. Locate the “TIFF to JPEG” Converter. You can usually find this by looking in the image conversion section. Or, you can use the website’s search.

Step 3: Upload Your TIFF File
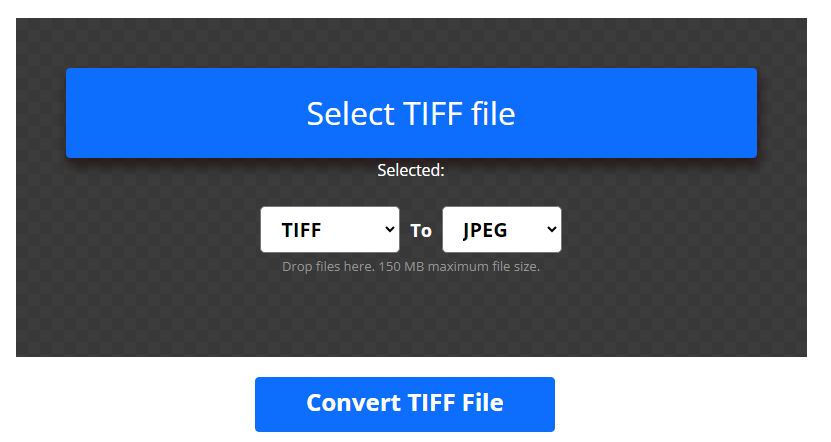
After selecting the TIFF to JPEG converter, you will be prompted to upload your TIFF file. The “Choose File” button will open a file selection window. Go to the location of your TIFF file on your computer, select it, and then click “Open.” Alternatively, you can drag and drop your TIFF file into the website’s section.
Step 4: Configure Conversion Settings
FileProInfo allows you to adjust certain settings for your JPEG output. These settings may include:
- Quality: Adjust the compression level to balance between file size and image quality. Higher quality means less compression and a larger file size.
- Resolution: Change the resolution of the output image if needed.
- Color Profile: Select a color profile if your original TIFF file uses a specific one.
Adjust these settings to your preferences. Or, leave them at their default values for standard conversion.
Step 5: Start the Conversion
After you’ve set the settings, click “Convert.” This will start the conversion. FileProInfo will process and convert your TIFF file to a JPEG. This process usually takes a few seconds to a minute. It depends on your file’s size and your internet speed.
Step 6: Download Your JPEG File
After the conversion, FileProInfo will give a link. It’s for your new JPEG file. Clicking the “Download” button will save the JPEG file to your computer. You can now use, share, and edit the JPEG file as necessary.
Tips for Successful Conversion
To ensure a smooth and successful conversion process, keep the following tips in mind:
- Stable Internet Connection: Ensure you have a stable internet connection to avoid interruptions during the upload or download process.
- Backup Your Original File: Always keep a backup of your original TIFF file in case you need to revert or encounter any issues.
- Check File Size Limits: FileProInfo may have file size limits for uploads. If your TIFF file is particularly large, check the maximum file size allowed and adjust accordingly.
- Optimize Settings: Experiment with different quality and resolution settings to find the best balance for your needs.
Benefits of Using FileProInfo
FileProInfo offers several benefits that make it an excellent choice for converting TIFF to JPEG:
- Free to Use: FileProInfo is completely free, making it accessible to everyone.
- No Software Installation: As an online tool, you don’t need to download or install any software on your computer.
- User-Friendly Interface: The website is easy to navigate, even for those who are not tech-savvy.
- Fast Conversion: The conversion process is quick, allowing you to get your JPEG files in no time.
- Privacy and Security: FileProInfo ensures that your files are securely handled and deleted from their servers after the conversion.
Conclusion
Converting TIFF files to JPEG is a practical solution. It improves compatibility, shrinks file size, and enhances readability. With FileProInfo, the process is straightforward, quick, and free. Are you a photographer looking to share images online? Or, are you a business professional needing to streamline document management? Converting your TIFF files to JPEG can greatly help your workflow. Follow the steps outlined in this guide, and you’ll be able to convert your files with ease.


