When it comes to editing and repairing print files, there are two main types of modeling software you can use: CAD (Computer-Aided Design) and mesh editing tools. CAD software is the preferred method of repair, especially if you have the original file format. However, if all you have is a converted and simplified 3D model, often in STL format, mesh editing tools can be a viable alternative.
The problem with STL files is that they are just shells with no filling, resulting in thin walls and other issues that can cause problems when 3D printed. CAD software like Tinkercad, FreeCAD, or Blender can be used to edit and repair STL files, but they are limited to the available information in the file itself. Mesh editing tools like Meshmixer and MeshLab can provide a more effective solution for editing and repairing STL files.
In this article, we’ll provide an overview of the best free CAD and mesh editing programs available for your STL repair needs. We’ll also include step-by-step tutorials to help you fix common issues, such as non-manifold edges.
If all of this seems overwhelming and you simply want to get a few pieces printed, consider exploring a 3D printing marketplace where you can easily order high-quality prints from reliable manufacturers.
1. Tinkercad
Tinkercad is an online CAD program developed by Autodesk, which is completely free to use. You can access Tinkercad by creating a free account on their website or by logging in with an existing Autodesk account. One of the key features of Tinkercad is its use of basic shapes and primitives as building blocks to create 3D models. It also allows you to import and edit STL files.
Tinkercad is ideal for simple edits, such as adding text, removing part of a design, or combining two STL files into a single model. The tool is user-friendly, runs smoothly, and has all the basic tools you need to create a simple 3D model. However, it may not be suitable for more complex editing tasks that require surface modeling or mesh repair tools.
Step 1: Import an STL
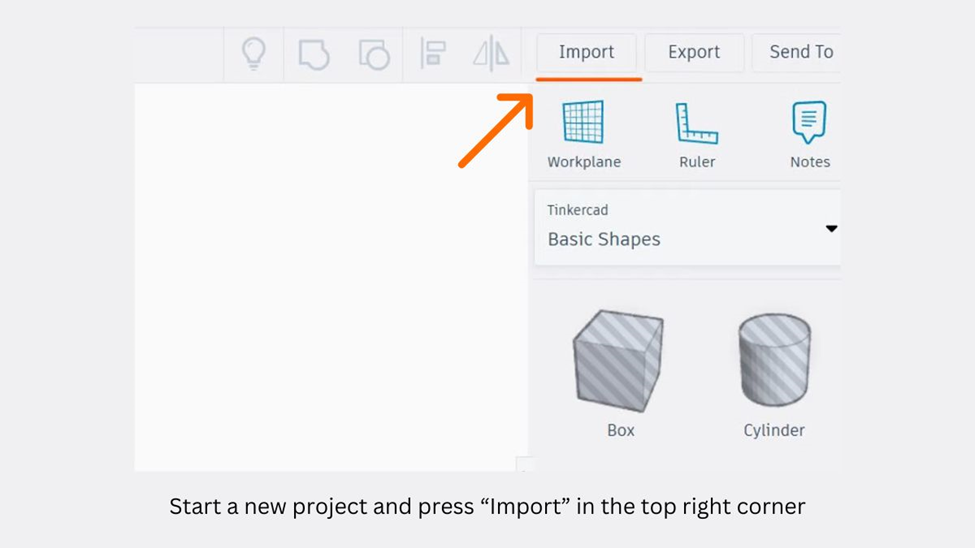
After creating and logging into your Tinkercad account, you can begin editing your STL file. The first step in the editing process is to import the file into the program.
- Open a new design in Tinkercad.
- Click the Import button located in the upper right corner of the screen.
- Click on “Choose a File” to select the STL file you want to edit.
- Once you have chosen your STL file, click “OK” to import it into Tinkercad for editing.
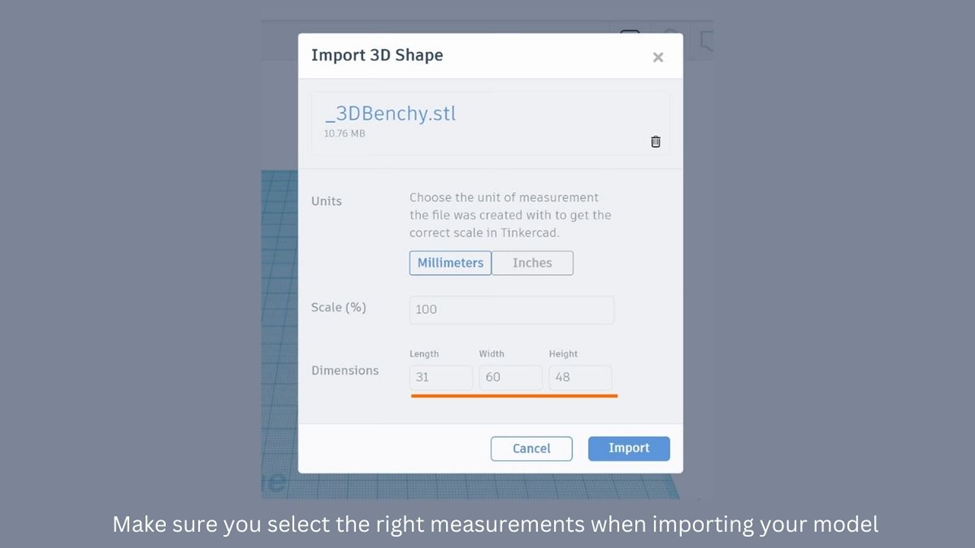
Step 2: Apply Size and Scaling Adjustments
When you’re using Tinkercad, before you import your design into the workspace, you’ll get a simple overview of the STL file. This overview includes the dimensions of the different parts of the design. If you want to change the size of your design, this is the perfect time to do it.
- Enter the scaling percentage or the desired dimensions into the designated fields.
- Once you have entered the values, click on the “Import” button.
The process of uploading a file into Tinkercad’s workspace may take some time, usually around a minute. The exact duration depends on the file’s size and complexity.
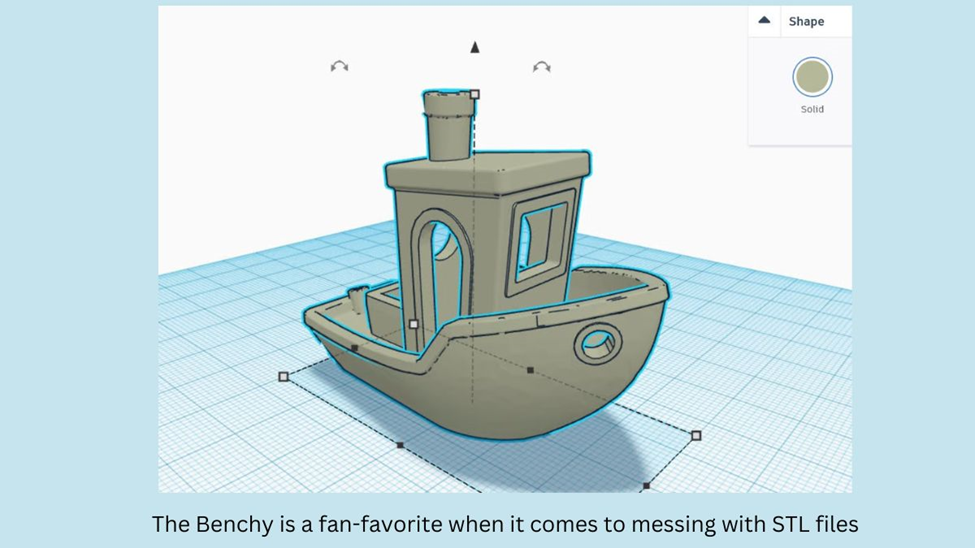
Step 3: Edit STL File
After Tinkercad has finished importing your file, you can make use of its wide array of basic shapes, shape generators, and various other shapes to edit your STL design. Moreover, you can import other STL files to further enhance your design. You can also adjust the size and scale of your design by dragging the points provided within the workspace.
Step 4: Export as STL
After you have made all the necessary changes to your design, you can export it as an STL file.
- Select all the elements you want to include in the final design.
- Look for the “Export” option located at the upper right corner of the Tinkercad workspace.
- Click on the “Export” button to start the process.
- Follow the prompts given by Tinkercad to export your design as an STL file.
Tinkercad’s Pros and Cons
Tinkercad is a user-friendly tool that runs seamlessly and provides all the essential features required for creating simple 3D models. However, it lacks some crucial features that a proper STL editor should have, such as surface modeling tools and mesh repair options.
2. Blender
Blender is a versatile and feature-packed program that can be downloaded easily from its project website. It is an excellent option if you wish to create high-polygon models and is equipped with tools to import STL models and prepare them for editing. However, due to its vast array of tools and commands, it has a steep learning curve. Additionally, displaying some models may require high computing power, particularly when subdividing the model into smaller faces. To help you get started with the software, we offer various tutorials, including one on how to make 3D maps in Blender.
Step 1: Open STL File
- Delete the cube by hovering your mouse over it and pressing the “Del” button.
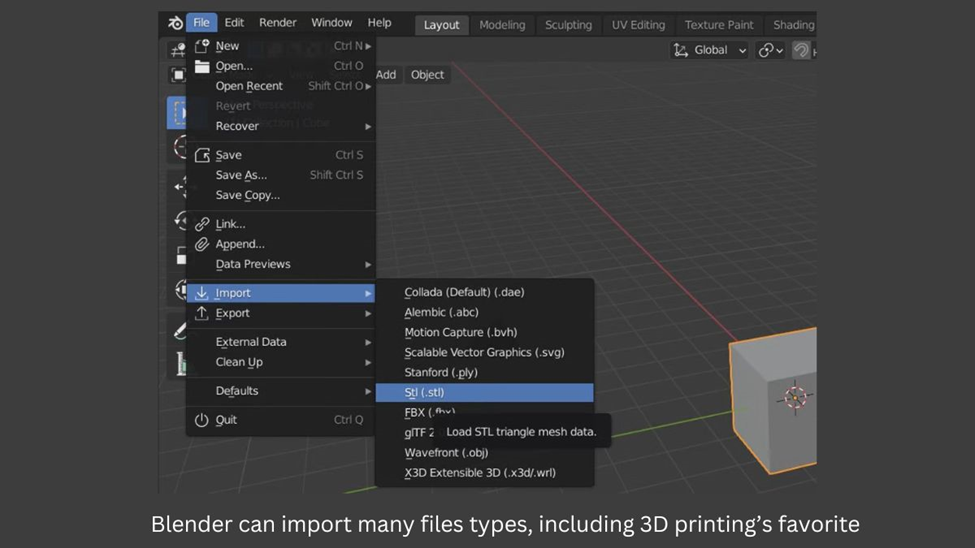
- To import an STL file, first, click on the “File” menu located at the top of the screen. Then select “Import” and choose “STL“.
- Browse for the STL file you want to open and select it.
- Click on “Import” to import the file into Blender.
Step 2: Edit STL File
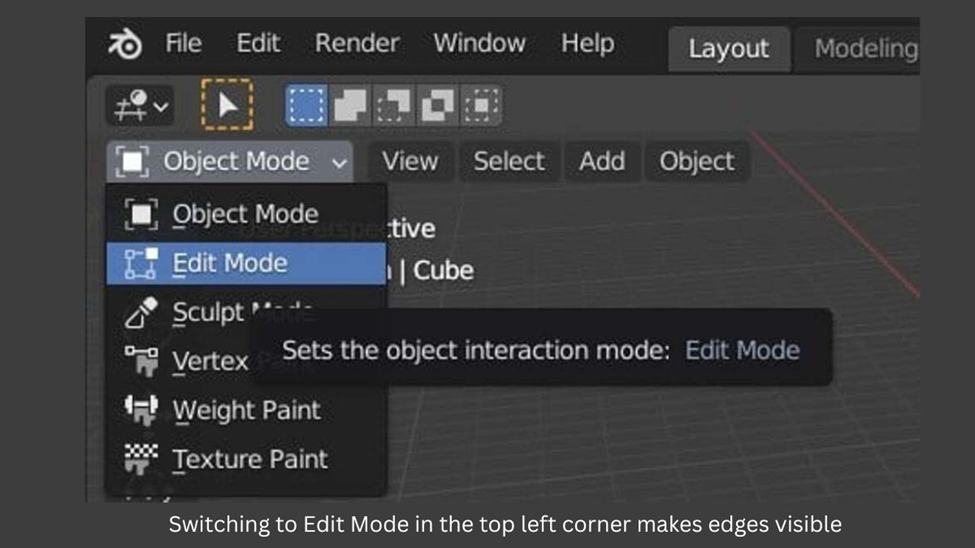
- To view the edges of your model, switch from Object mode to Edit mode. This will allow you to see all the individual edges that make up your model.
- To select all elements of the model, press A or draw a box over individual points, edges, or planes with the left mouse button.
- To convert triangles to rectangles, press Alt+J.
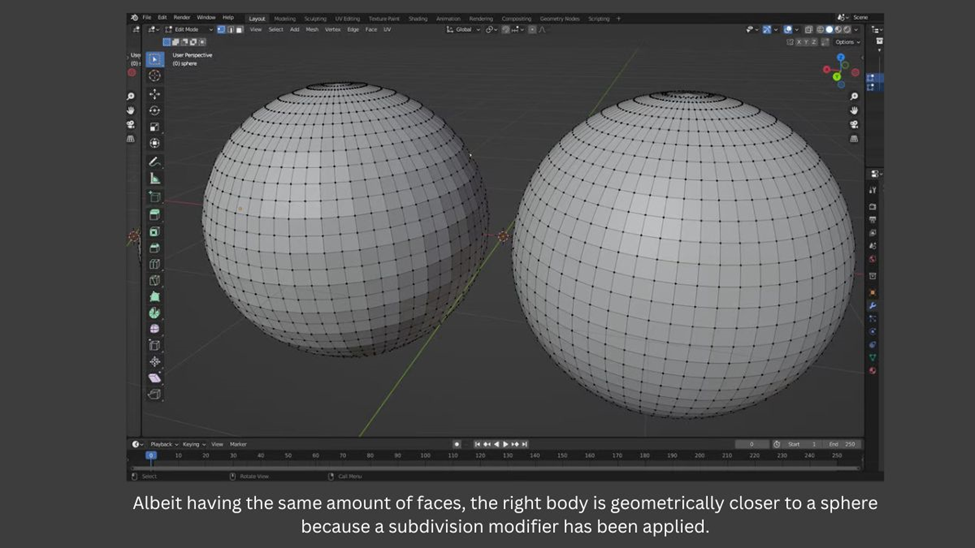
- To change the number of tiles in the model, either search for Subdivide or Un-Subdivide, or right-click to access the Subdivide tool. Keep in mind that this method only increases the number of polygons by interpolating from the pre-existing ones, so the model will not have more detail, only more faces.
- If you want to increase detail and surface curvature, go back to object mode and apply a Subdivision Surface modifier. Then, export the resulting geometry as STL. If you need more help, check out our guide on the modifier
- Use one of the three selection options – Vertices, Edge, or Face Select – to choose the parts of the model that you want to work with. You can then extrude, move, or delete those parts as needed.
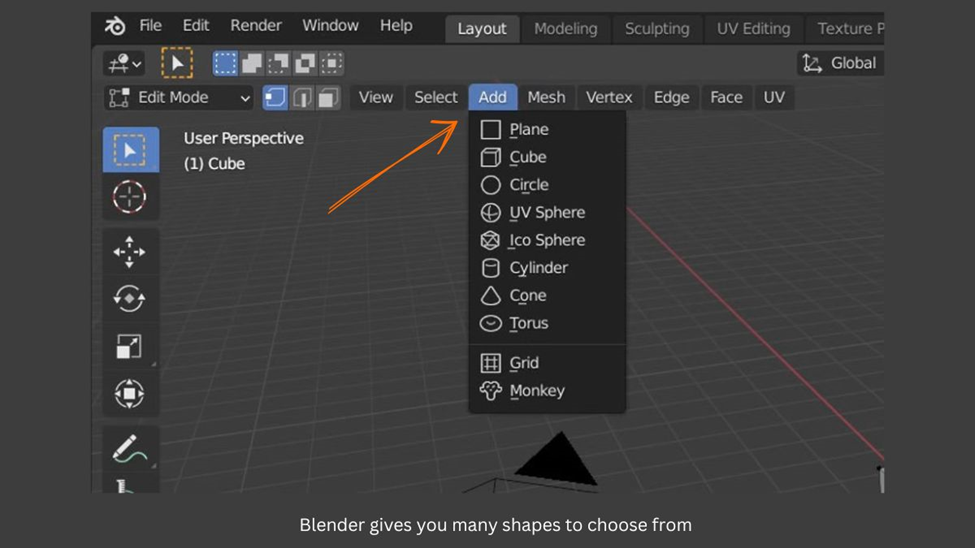
- To add different shapes to your model, search for them using the search bar. Some options include Adding a Plane, Cube, and Sphere. Once you’ve added the shape, you can manipulate it using the selection options mentioned above.
- The Extrude command allows you to extend or stretch a selected area of your model in a particular direction, giving it more depth or dimension.
- To cut or merge one shape with another, use the Boolean command. This command allows you to combine two shapes by adding or subtracting one shape from another. By using Boolean operations, you can create more complex shapes and achieve the desired look and feel for your 3D model.
Step 3: STL Repair
In addition to importing STL files, Blender also includes a built-in STL repair tool. This tool allows you to fix any issues with your STL file, such as missing or overlapping faces, and ensure that it’s ready for use in your 3D model. With this tool, you can quickly and easily make any necessary repairs to your STL file without having to rely on external software.
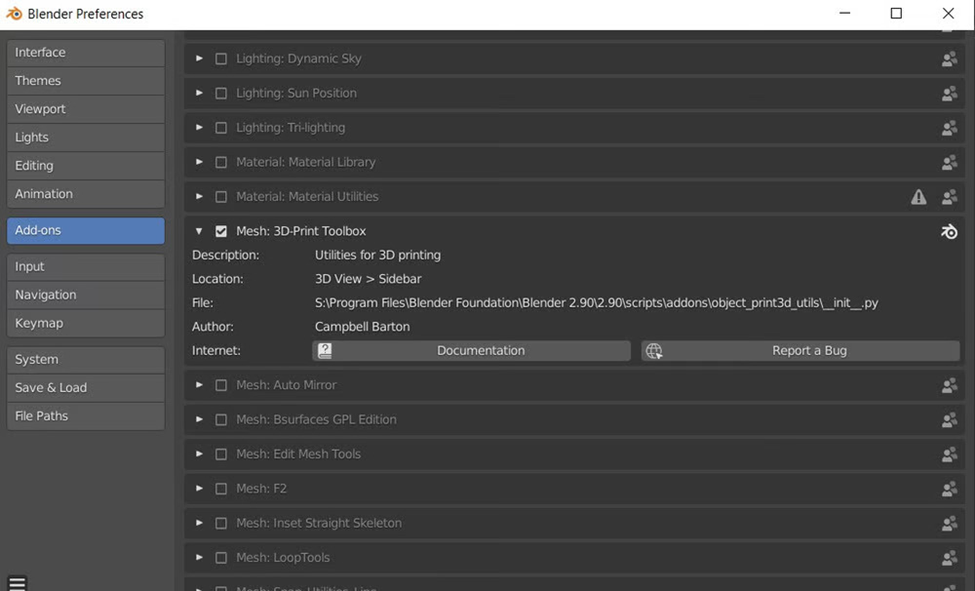
- Activate the 3D Print Toolbox:
- Navigate to the Edit option located on the top menu bar of the screen.
- Select Preferences from the dropdown menu. Click on Add-Ons in the Preferences window.
- Look for Mesh: 3D-Print Toolbox and click on the checkbox to activate it.
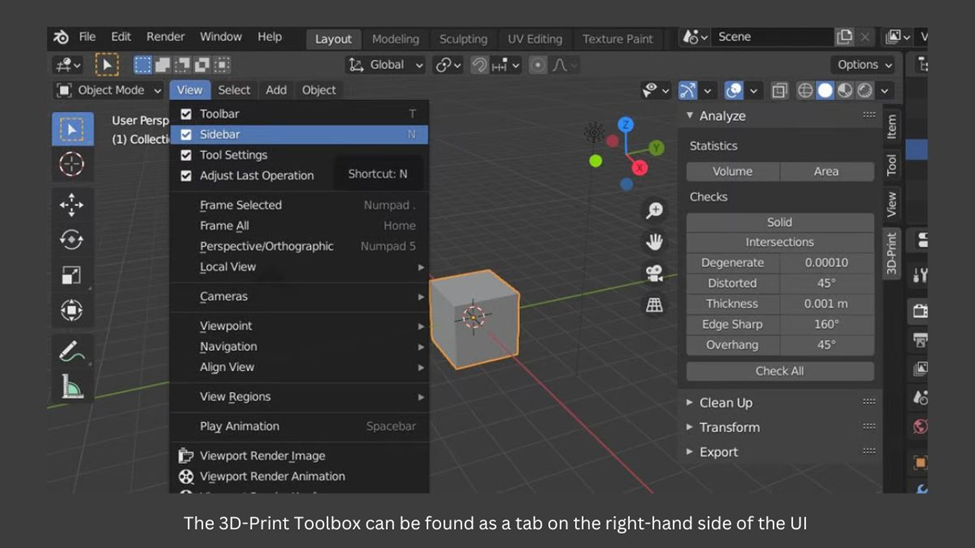
- To access the 3D Print Toolbox in Blender, make sure you have the left sidebar enabled by pressing N or going to View > Sidebar, then locate the toolbox in the sidebar.
- Blender’s 3D Print Toolbox is a powerful tool that helps you prepare your 3D models for printing by identifying and addressing potential printing issues. Here are some of the specific issues that the toolbox can help you address:
- Overhangs: These are areas of your model that are at risk of collapsing or sagging during printing because they don’t have enough support. The 3D Print Toolbox can help you identify overhangs and suggest support structures to add.
- Wall thickness: Some areas of your model might be too thin to print properly. The toolbox can identify these areas and suggest ways to thicken them up.
- Manifolds: If your model has intersecting or overhanging geometry, it can confuse 3D printers and cause printing problems. The toolbox can help you identify and fix these issues to ensure that your model prints correctly.
- To check for printing issues in your model, use the 3D Print Toolbox in Blender.
- You can check for all issues at once by pressing “Check All,” or go through them one by one.
- If any errors are found, they will be listed at the bottom of the toolbox, which you can cycle through.
- To repair isolated vertices and edges, use the “Isolated” tool.
- To make your mesh manifold and fix intersecting or overhanging geometry, use the “Make Manifold” tool.
Step 4: Export as STL File
To export your object as an STL file, simply go to “File,” then “Export,” then “STL,” and follow the instructions to save your file.
Using Blender, Pros, and Cons
Blender is an excellent choice for creating high-poly models with fine details. It provides a wide range of sculpting tools and editing options. However, working with Blender can take some time to get used to, and it may require a powerful computer to handle complex models.
3. FreeCAD
FreeCAD is a free and open-source CAD software that provides a variety of 3D modeling tools. You can easily download it from the FreeCAD project website by choosing the right version for your operating system and installing it. However, one drawback of FreeCAD is that it may struggle with intersecting structures, which can cause issues when editing STL files. In such cases, meshes with intersecting edges might become damaged. If you want to learn more about FreeCAD, you can check out this tutorial.
Step 1: Open STL File and Convert it to a Solid Model
- To begin, open FreeCAD and create a new document by clicking on “File” and then “New“.
- Next, import the object you want to modify by clicking on “File” and then “Import“. FreeCAD can open other mesh formats like OBJ and AST.
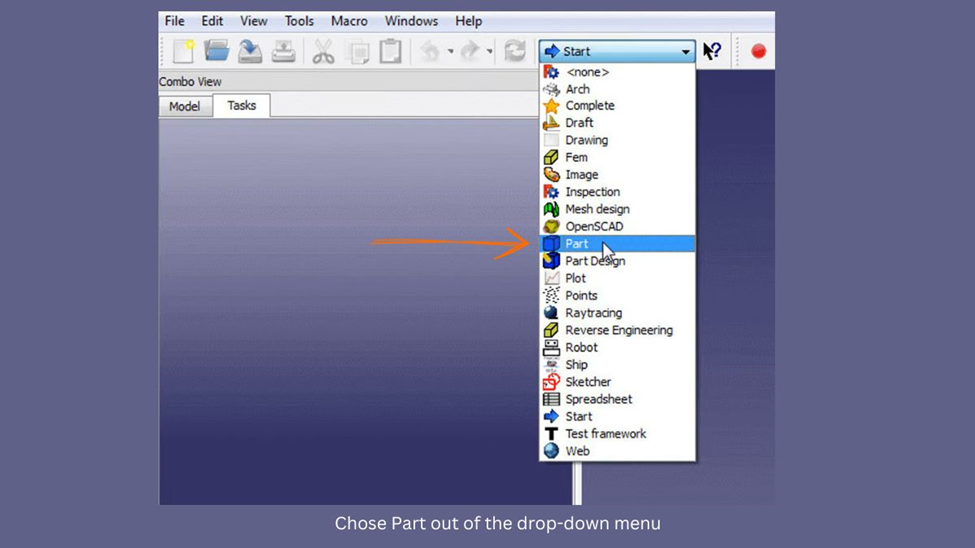
- Switch to the Part workbench.
- Choose the imported object from the Model window.
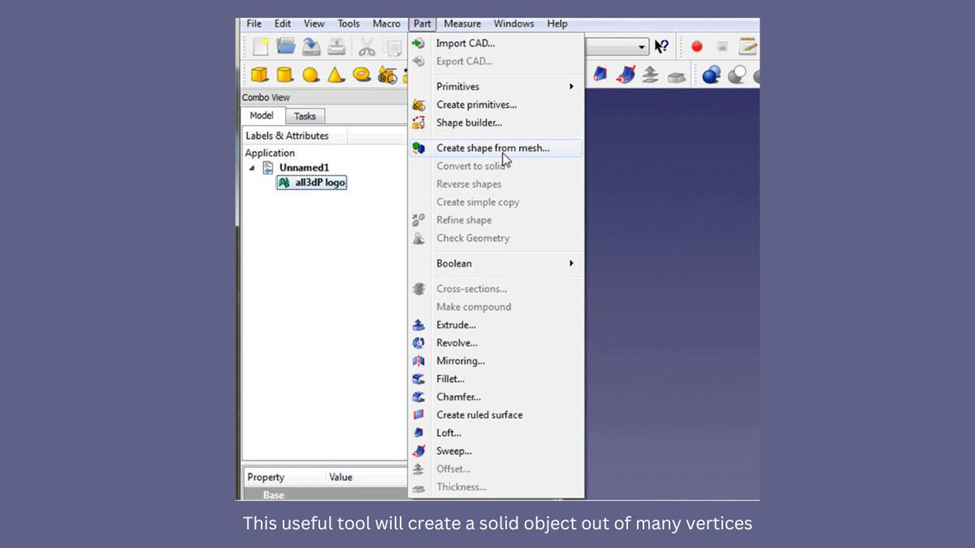
- Click on Part > Create shape from mesh to split the imported object into smaller triangles. You can adjust the precision of tessellation, but it’s recommended to use 0.10 for most objects. Using a smaller number will take longer to convert the object.
- After importing a mesh, you have the option to either delete it or hide it. Once you do this, you will be able to see the shape of the imported object, which is made up of multiple triangles.
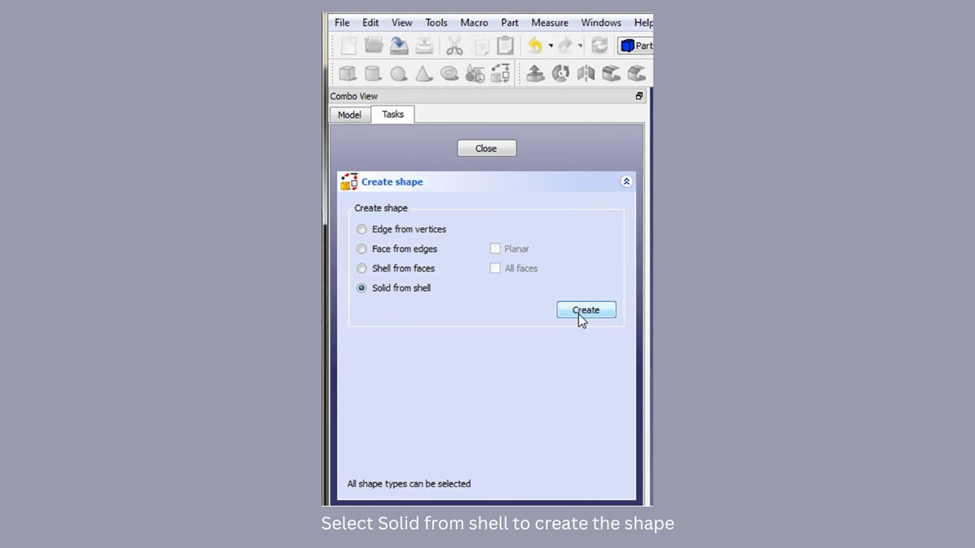
- To create shapes using the Advanced utility, first select “Solid from shell“. Next, choose any triangle that makes up your imported object and click “Create“. You won’t see any visible changes because the shape is overlapping with the solid. Finally, click “Close” to finish the process.
- After completing the previous step, delete or hide the previous shape that was created. Doing so will leave you with a solid object that represents your imported mesh file. This object is now ready for editing.
Step 2: Edit STL File
- Switch your workbench to Part Design.
- Select the face you want to add or remove material from, and it will turn green.
- Click on “Create Sketch” to begin editing the selected face.

- Use the circle, rectangle, or line drawing tools to create the shape you want to extrude or cut into.
- Click “Close” to confirm the sketch. If you need to make any edits to the sketch, double-click it in the model tree.
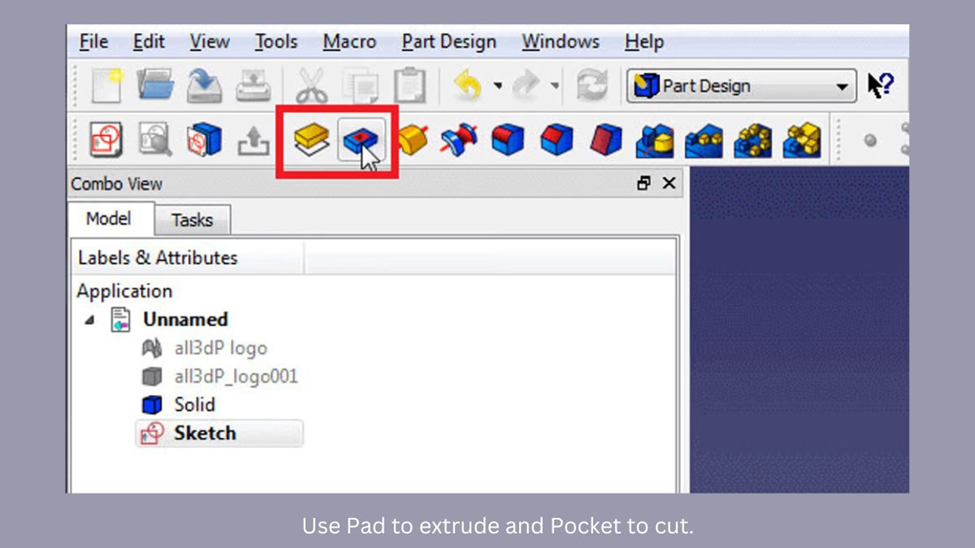
- Choose the feature you want to apply to the shape.
- If you want to extrude the shape, use the Pad tool. If you want to cut elements from the shape, use the Pocket tool.
Step 3: STL Repair
FreeCAD includes a comprehensive tool for repairing meshes:
- To access the mesh repair tool in FreeCAD, follow these steps:
- Select “Meshes” from the top menu.
- Choose “Analyze” from the dropdown menu.
- Select “Evaluate & repair mesh” to access the mesh repair tool.
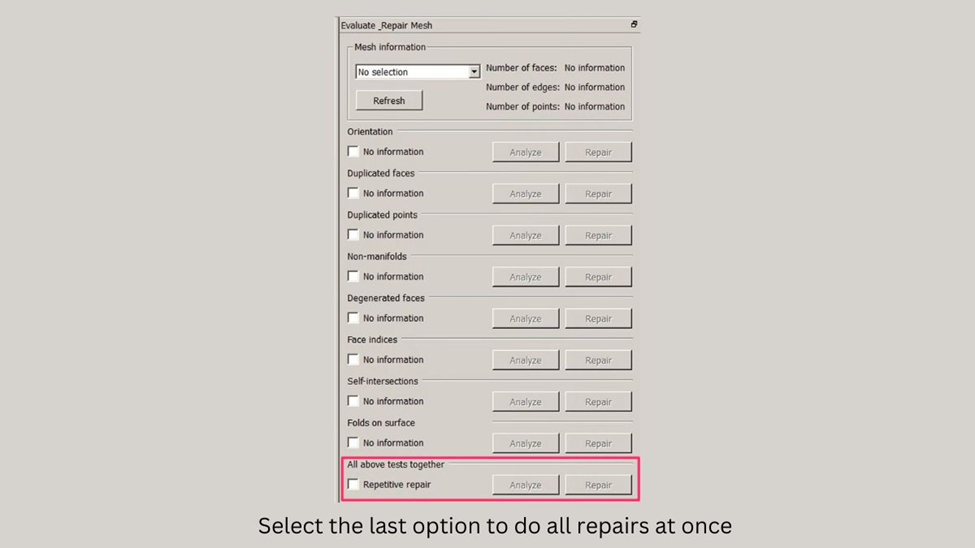
- If you know which defects your mesh has, select the corresponding item from the list and click “Analyze“. If you’re not sure, choose “All above tests together” and click “Analyze“.
- Once the analysis is complete, click “Repair” to fix any issues that were identified.
Step 4: Export as STL File
- To export the repaired mesh file, select the last feature in the model tree.
- Next, click on “File” from the top menu, select “Export“, and choose the desired mesh format from the options.
Using FreeCAD, Pros, and Cons
When using FreeCAD to edit STL files, you may find that its purpose is primarily to create precise models for mechanical purposes. This makes it a great tool for constructing technical objects. However, when it comes to sculpting or creating more organic shapes, FreeCAD can be difficult to use because it lacks a free move-around 3D view. As a result, sculpting in FreeCAD is nearly impossible.
4. MeshMixer
MeshMixer is a free mesh editing program developed by Autodesk Research that is simple to use and includes a built-in slicer tool. This means that once you have finished editing your model, you can easily send it directly to your 3D printer for printing. To learn more about preparing, repairing, or checking your object for 3D printing with MeshMixer, check out this tutorial for an in-depth look.
However, as of September 2021, Autodesk no longer supports MeshMixer, and the tool is no longer being developed. The software is still available on the MeshMixer website, but many of its popular features have been integrated into Fusion 360, a unified software that combines CAD, CAM, and PCB functionalities.
Step 1: Open STL File
- To import an STL file, all you need to do is click on the “Import” button and then browse for the object that you want to import.
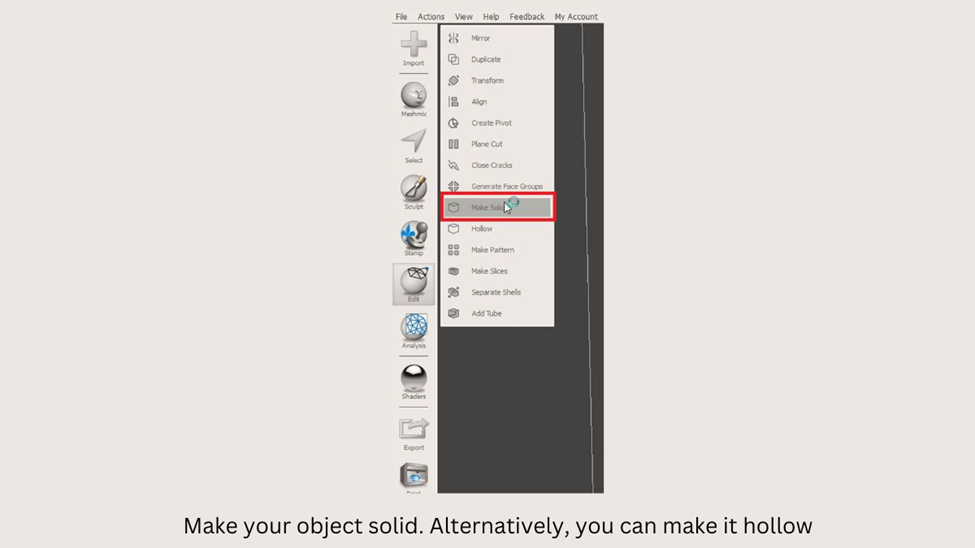
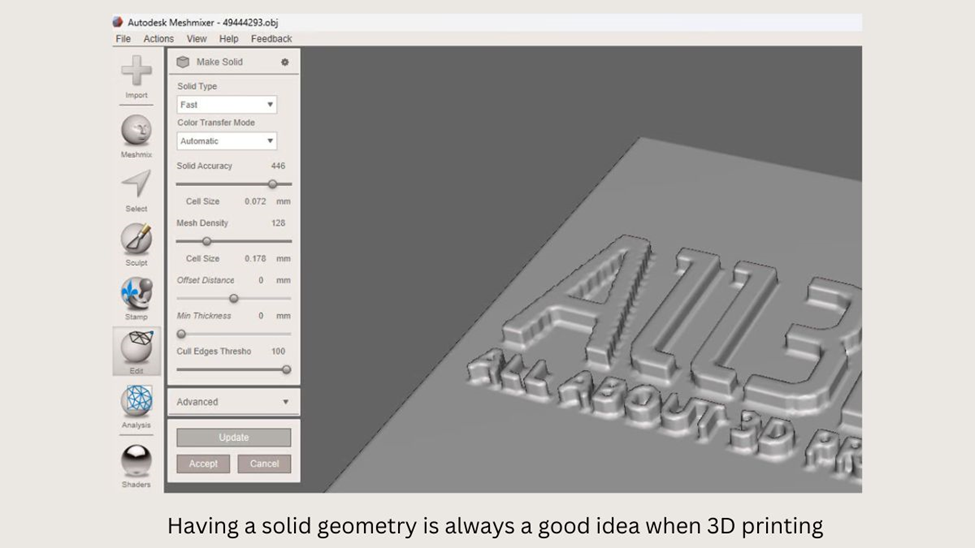
- Click on Edit > Make Solid.
Step 2: Edit STL File
- Use the “Select” tool to mark the specific parts of your model that you want to work on.
- Press the “Del” key on your keyboard to remove the marked tiles from your model.
- Utilize Meshmix to explore and experiment with different shapes and forms for your model.
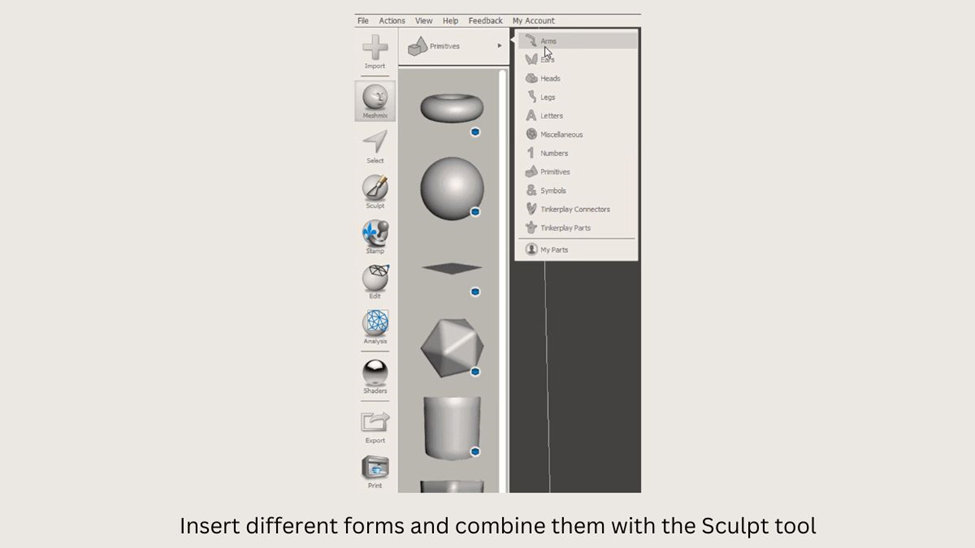
To access more models in the program, simply switch from basic shapes to other categories such as arms or legs. Once you find the desired object, drag and drop it into your workspace. Then, use the colored arrows to move or rotate the model, and the small square in the middle of the arrows to scale the model to your desired size.
- To manipulate your model, click on the Sculpt tool. This allows you to either smooth or extrude various regions of the model according to your preferences.
Step 3: STL Repair and Preparation for 3D Printing
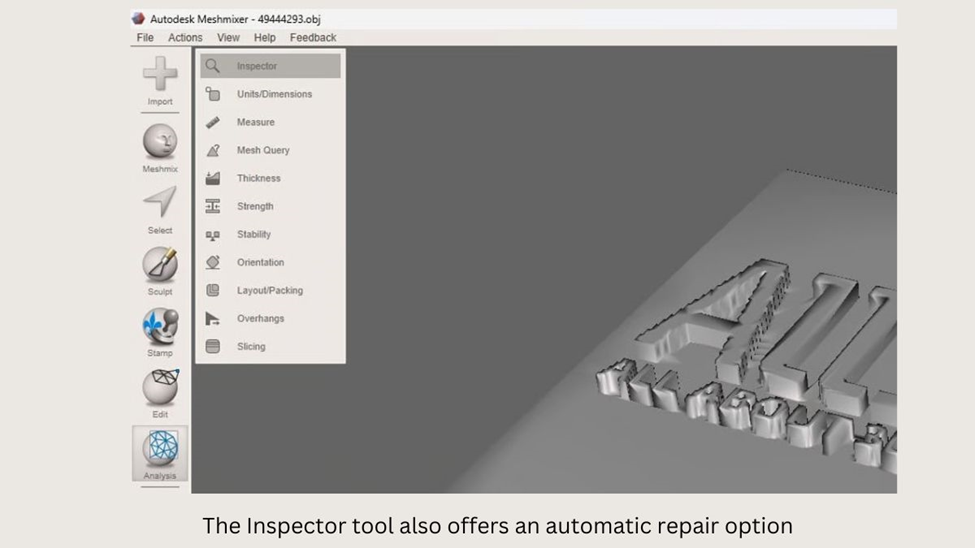
- To access tools for preparing your STL file for 3D printing, select the Analysis option on the sidebar. Here, you will find a range of helpful tools, such as Inspection and Overhangs, that can assist in getting your model ready for printing.
- In Meshmixer, you can repair STL models by going to the Edit tab and selecting Make Solid to create a manifold geometry. However, be careful when using this method as many settings can significantly change the model’s shape. It’s important to understand what each setting does before applying it.
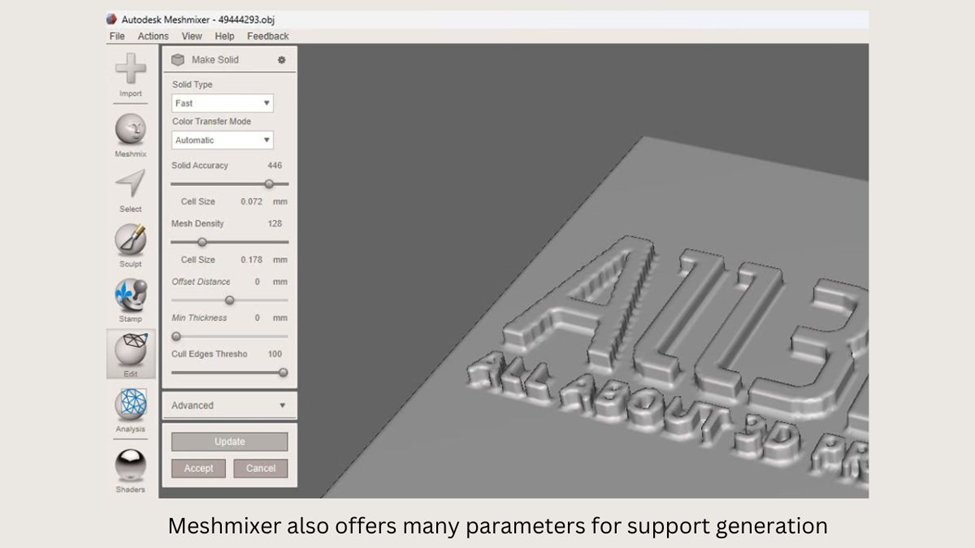
- If you want to create support structures in Meshmixer instead of using your printer’s software, select the Overhangs tool in the Analysis tab. You can then generate custom or preset support structures by inputting your preferred values and clicking on the Generate Support button.
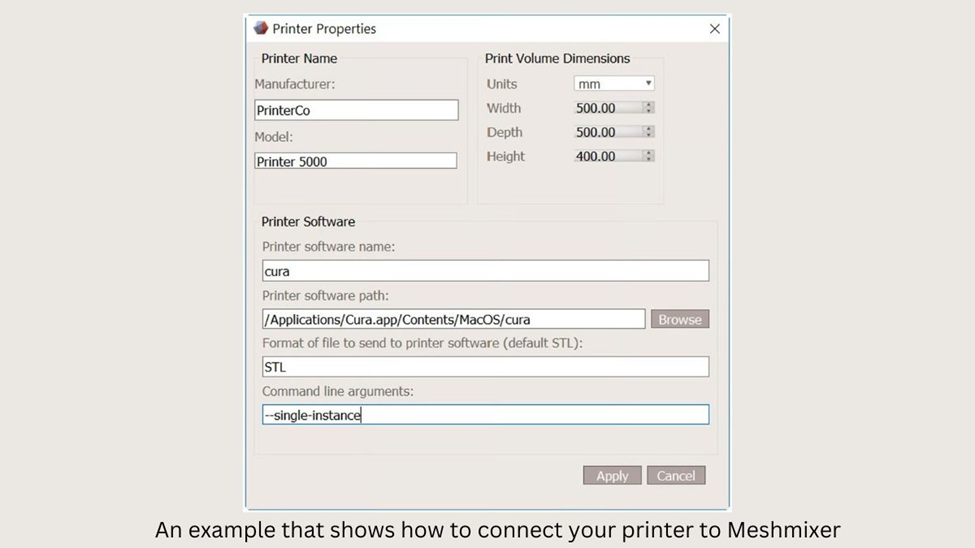
- To print your model in Meshmixer, go to the Printer tab and click on Send to Printer. If this is your first time using Meshmixer, you’ll need to add your 3D printer to the program by selecting it from the provided list or creating a custom profile. You’ll also need to link your printer software path to Meshmixer. Once you’ve done this, you can send your model to the printer for printing.
Step 4: Export as STL File
To save your object as a file, click on the File menu and choose Export. Then select the STL file format.
Using Meshmixer, Pros, and Cons
MeshMixer is a powerful and user-friendly tool for editing STL files, which can effectively fix common issues such as thin walls. It’s a great choice for resizing models, making modifications to specific areas, or adding new features to an existing design. Overall, MeshMixer is a valuable tool for anyone looking to work with STL files as an editor.
5. 3D Slash
3D Slash is a free and user-friendly 3D modeling software that uses a building-block concept similar to Minecraft. You can access it through the 3D Slash website. It’s a great option for hobbyists who want to create 3D designs without having to learn complicated software. However, if you aspire to become a professional 3D designer, it’s better to choose a conventional free STL editor like TinkerCAD instead. If you want to learn more about 3D Slash, check out this detailed product review.
Step 1: Open STL File
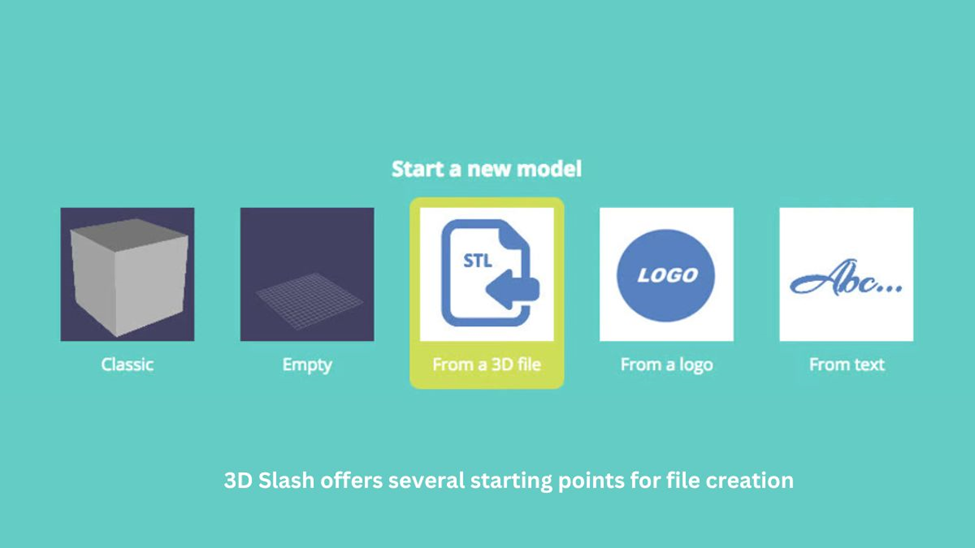
To begin working on an STL file in 3D Slash, select Start a new model and then choose From a 3D file. You can either browse for the file on your hard drive or simply drag and drop it into the browser to load it into the software.
Step 2: Edit STL File
The mesh is transformed into a pixelated model that can be easily modified using 3D Slash.
- Click on the tool icon in the upper left corner of the viewport to select your tool.
- You can add different shapes to the scene to start a new project.
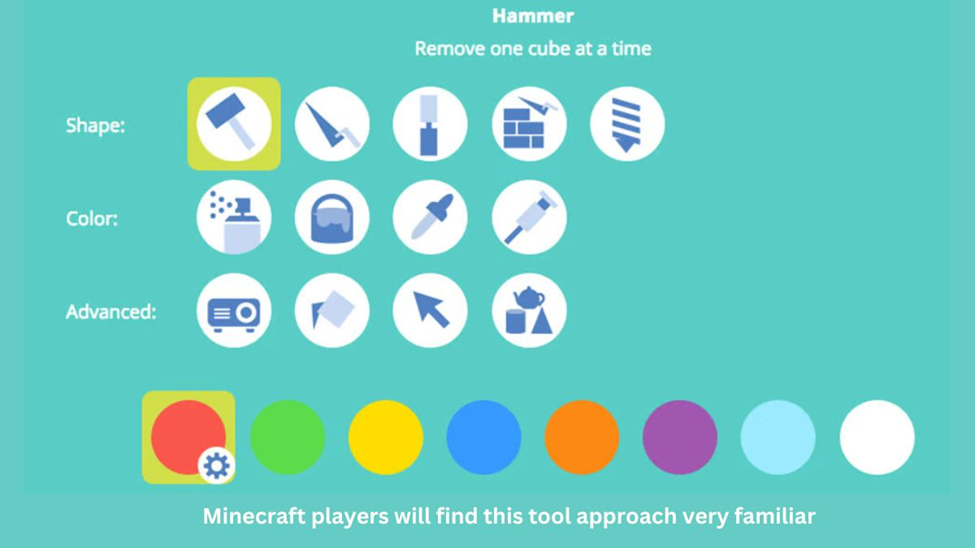
- Use the following tools to add or remove cubes in various sizes:
- Hammer: remove cubes.
- Trowel: rebuild cubes.
- Chisel: remove slices of cubes.
- Wall: rebuild slices of cubes.
- Drill: remove everything inside the limits selected.
- You can change the size of the cubes using the menu on the left side of the screen.
Step 3: Export as STL File
- Click on the floppy disk icon located in the upper right corner of the screen.
- Next, select the “Save as” option and choose “STL file” as the file format to export the mesh.
3D Slash, Pros, and Cons
3D Slash is a great option for hobbyists who want to create 3D designs occasionally without the complexity of traditional 3D modeling software. However, if you aspire to become a professional, it’s better to use a traditional free STL editor like TinkerCAD. Unfortunately, the free version of 3D Slash doesn’t allow saving modified 3D designs in the STL format, which limits the user experience. Despite this limitation, we still recommend 3D Slash as an STL editor worth trying.
6. SculptGL
SculptGL is a 3D sculpting software that is easy to use and accessible via your web browser. It provides only the essential tools needed for sculpting, making it different from professional software like ZBrush or Mudbox.
One downside to SculptGL is that it can sometimes generate non-manifold vertices. However, if you’re just starting to explore 3D printing, SculptGL is still a great free editor to start with.
Step 1: Open the STL file
- To start, you can clear the default primitive by clicking on Scene, and then selecting Clear Scene.
- After that, you can load your STL file by clicking on File, and then selecting Add. From there, you can choose the file type you want to import, such as obj, sgl, ply, or stl.
Step 2: Edit the STL file
Start by using a large tool to define the major features of your mesh, such as arms, heads, and limbs. Once you have established the basic shape, switch to smaller brushes for adding finer details.
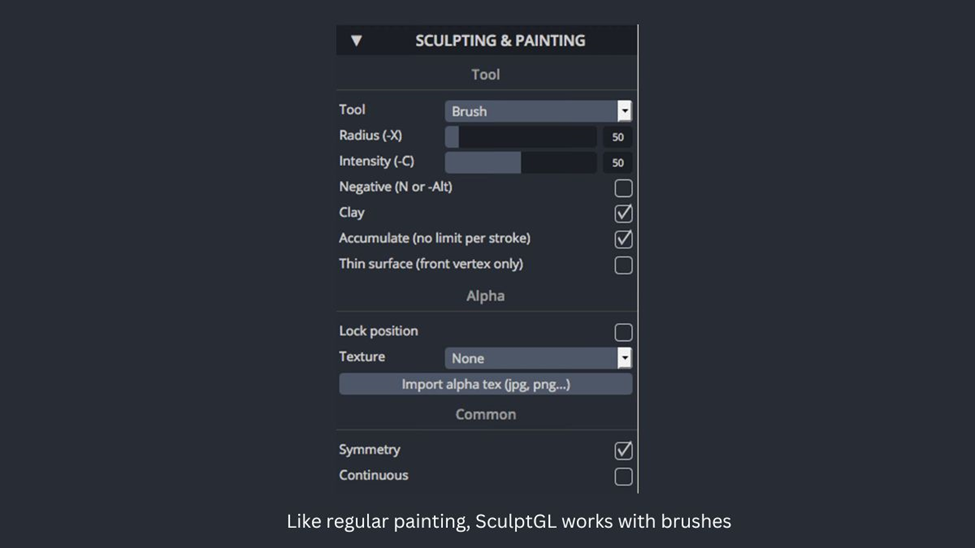
- You can change the size of the tool you are using by going to the Sculpting & Painting toolbar and adjusting the Radius setting.
- Select any tool from the available options to begin creating your 3D model.

- You can use the Symmetry button to save time when sculpting. This feature lets you sculpt only one half of the mesh, while the other half automatically mirrors your changes.
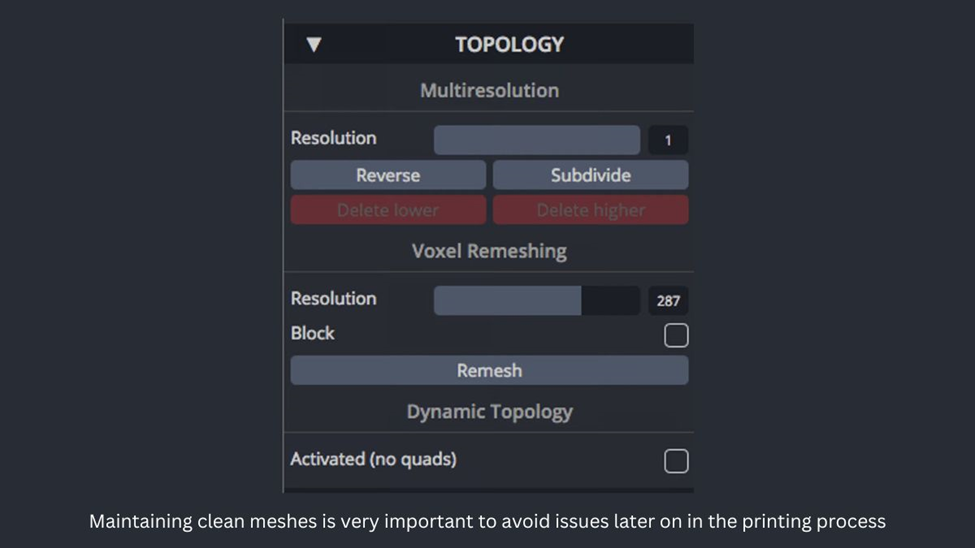
- If you want to add finer details or notice that the STL file’s surface quality is deteriorating, you can increase the resolution in two ways: (a) by subdividing the mesh through Topology > Multiresolution > Subdivide, or (b) by remeshing the mesh and selecting a higher resolution at Topology > Voxel Remeshing > Resolution, then clicking Remesh.
Step #3 Export as STL file
- Click File (import/export) > Save stl.
Using SculptGL, Pros and Cons
SculptGL is an excellent introduction to 3D sculpting and a great option for those who are curious about the process. However, after trying more advanced software like ZBrush or Mudbox, you’ll begin to understand the full potential of this exciting method for modeling and editing STL files.
7. MeshLab
MeshLab is a free and open-source program that can help you with various tasks related to 3D models. With MeshLab, you can view, merge, transform, or repair files in many different formats, such as STL, PLY, OFF, OBJ, and 3DS. MeshLab does not have tools to create new objects, but it’s still a useful tool for tasks like repairing or combining meshes. For example, you can merge meshes of 3D scans to create new models. MeshLab is available for free and can be downloaded from the project website.
Step 1: Open STL File
To open a mesh file that MeshLab supports, you need to follow these steps:
- To get started, access the top menu and select the “File” option.
- Choose the “Import Mesh” option from the drop-down menu that will appear after clicking on the “File” option in the top menu.
- Browse through your computer files to locate the 3D model you want to import.
Step 2: Edit STL File
MeshLab is not designed to create new objects or vertices. However, it is a useful tool for combining meshes from 3D scans, as well as for removing unwanted parts and repairing holes in a model.
How to merge two meshes:
- Open both models in MeshLab.
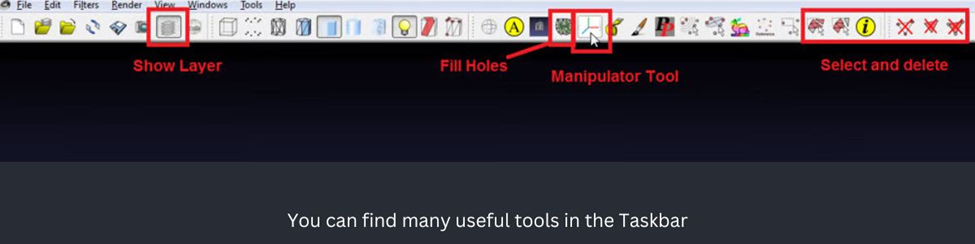
- Click “Show Layers” to see both models in the workspace.
- To transform, rotate or scale a model, select it in the Layer menu.
- To access the transformation tools, click on “Manipulator Tools“.
- To select the Transform option, press the “T” key. For rotating the model, press “R“, and for scaling, press “S“.
- You can drag and drop the arrows to move or scale the model in a particular direction.
- Rotate the view of the object by turning the circle around it.
- Press Escape to rotate your view, and press it again when you have the desired view on the object.
- Press Enter to confirm the placement.
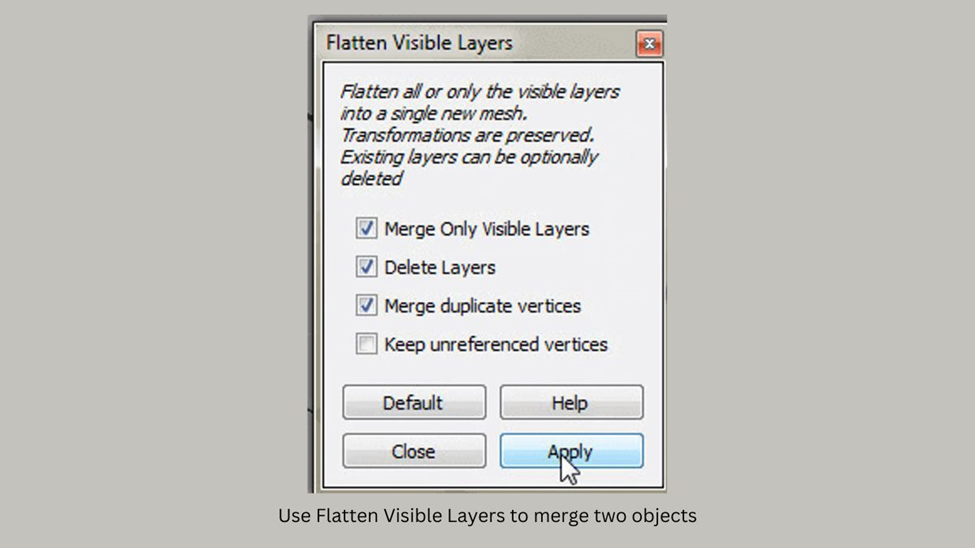
- After you have assembled all the parts of your mesh, right-click on any part of the combined mesh. Then, select Flatten Visible Layers. Make sure to check the first three boxes and click on Apply.
How to delete a section of a model:
- To delete a part of the mesh, use the rectangular selection tool and select the area you want to delete. After selecting the desired portion of the mesh, you can delete it by clicking on “Delete the Current Selected Face and Vertices“.
How to repair your object or search for holes:
- To repair your model or search for holes, click on “Fill Hole” in the toolbar. A window will appear showing all the holes in the model. Select the holes you want to fill by clicking on them, and then click on “Fill” and “Accept” to finish. Note that this option requires your model to be manifold.
Step 3: STL Repair
To check if your STL file is complete without any holes, follow these steps:
- Click on Filters.
- Select Quality Measures and Computations.
- Click on Compute Geometric Measures.
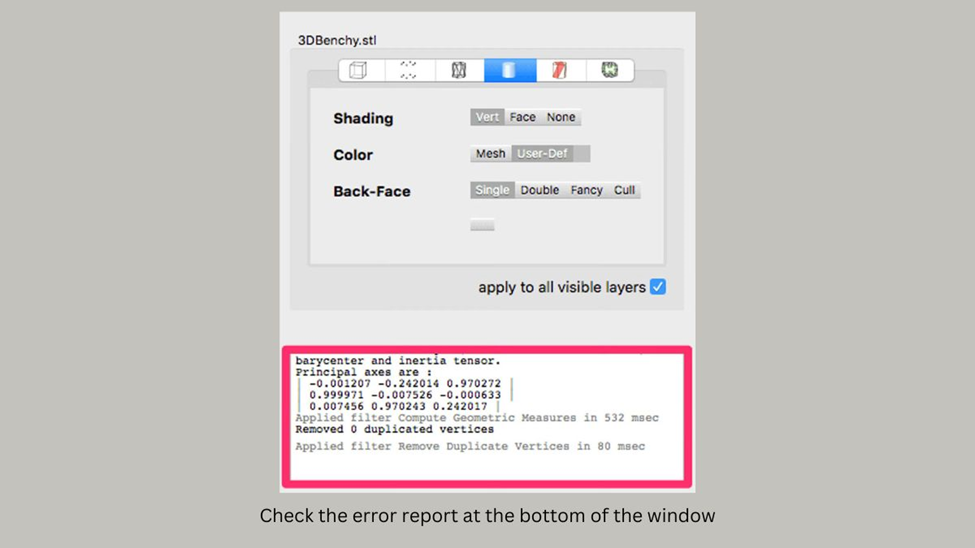
- Look at the dialog box on the right side of the screen. You should see a volume measurement for your file. If there are any errors, the dialog box will provide an error report.
- If your STL file is not watertight, you can fix it by following these steps:
- Go to Filters > Cleaning and Repairing > Merge Close Vertices, and click Apply.
- Then, go to Filters > Cleaning and Repairing > Remove Duplicate Faces, and click Apply.
- Finally, select Filters > Cleaning and Repairing > Remove Duplicated Vertices.
- These steps will help you fix your file by merging close vertices, removing duplicate faces, and removing duplicated vertices.
- Recheck your STL file.
Step 4: Export as STL File
To save your model, click on the File tab and select Export Mesh.
Using Meshlab, Pros, and Cons
MeshLab may not provide tools for creating new objects, but it is still an excellent option for STL editing tasks such as merging or repairing meshes. You can easily use MeshLab to combine the mesh of a 3D scan or even create new models by merging them.